Showing posts with label practical task. Show all posts

Thursday, 25 February 2016

Lighting Experiments

Lighting is a huge part for making any production in media, and can affect the way something is viewed, and can have meanings behind how the lighting is done. For instance, lighting can be used to make someone look differently, like Demi Lovato, once photographed from the side with a bright flash made her into an internet meme that was called "Poot." and was mocked because of the way the light changed her face. I have used the realistic figure of Henry Caville's Superman to show how a face can look differently, with the same expression. The first picture makes him look as he is suppposed to, an ideal of Hope. He is seen as a symbol to strive towards, and looks up to be the Man of Tomorrow. The light is not artificial, meaning it is not the sun's light, but without seeing the lighting in frame it can look like it is the sun, and Superman looks like he is there to protect humanity and life itself. 


The next picture is a change of lighting, and makes Superman look like a killer, this is what I mean by how lighting changes the scene, and with this same expression and simple change of lighting, Superman looks like a murderer and someone who has the intentions of a mad man due to his face having light shined on it from his chin and up. His expression is evil, and looks like someone who is not willing to save humanity, and this is how lighting can be manipulated and experimented on to change the emotion of a scene. 


The next two pictures are of a statue of Batman holding up Joker by his purple blazer, and getting ready to drop him. The lighting is huge for this character, as he is dark and brooding, and as he says many times "I am the night." So it is obvious that his lighting must be in the dark, and not artificial, using light from bulbs and torches as well as the moonlight, and in the interrogation scene for The Dark Knight, the lighting used is small at the beginning and we are not even aware of Batman's presence until the lights come on. 
The picture on the left shows how lighting can ruin a scene. The tense moment before Batman beats the high hell out of the Joker is ruined by the brightness of the scene, and the picture on the right shows how lighting can make a scene more dramatic and effective, with light being lost and closed off in this scene as it looks like the presence of the caped crusader causes fear to replace light with darkness.


Head in a Jar Practical Prop

To make this prop, all I did was get a large jar that was filled with mince. The mince was not important, and was scraped into the food bin as soon as I got home. Once the jar was washed out thoroughly to clean it from the mince and juices, it was clean and see through, and I then typed in Google "Head in a jar picture" which after searching came up with the picture below, and I printed it off, 150% the size of A4 and rolled it inside of the jar to make the illusion of it being a 3D head. It looks better from distance, in dark light and different angles, and the reason for this is because the insides of the jar are narrower as it goes down, and its shape inside is different as it goes down, not letting the paper expand all the way and roll around without parts being missing from the inside. 


Student Made Production Company

Here is the original image for my own production company that I had to make. I did not know how to make it a video, and did not have the software so I made it a picture, and it does not move. It would be a production company that stays on screen for a few seconds and leaves for something better. To make the image, I used a fake Oscar Statue, and placed it against the window, facing the light and took a picture with my phone, which has an iPhone 5s camera.
I then added text to it using Macromedia Fireworks. It was a "Century Gothic" font, and the size was 300, I placed it on the right, just near the right shoulder of the Oscar Statue and called it "Oscar Bait", also making the colour gold like the statue, a parody, if you will, of all the films that come out just to get Oscars. 

Wednesday, 24 February 2016

Practical - Cut on Stomach

Making a Fake Wound

 
In our opening scene I will be a dead person lying on a table in the lair with a fake cut on my stomach, so I need to be able to make a fake cut on my own stomach. I have done a fake cut before so I know how to do it but I think it will be harder to do when it's on my stomach so I am going to practice it and see if it will be good enough for the opening scene.

I started off with just PVA glue and a few layers of tissue and then let that dry for a little while because I think I used too much glue.


Then I added more glue and more tissue


After letting that dry I covered it with foundation and also put some foundation on the skin around the 'wound' to make it look a little bit more realistic. I also put powder over the foundation to reduce the shininess and then put a few colours on it with eyeshadow.


It didn't turn out how I wanted it to and the wound looks very fake. I don't have any fake blood but Olivia has some so when we film I will be able to put lots of fake blood onto the wound which will definitely help to make it look better. 

Monday, 8 February 2016

Editing Experiments

This is the stage after the production where all images and videos recorded are reordered into a narrative and ready to play for an audience. There are many ways that you can do editing for a production. There are many types of editing for a film, and the most common is Continuity Editing. This is where the film aims to create a sense of reality and time moving forward. Doing this editing technique for our film is the most simple to do, and obviously the one that won't confuse the audience. Sometimes having a different type of editing makes some films better, like the film 'Memento' which makes the story and plot so much more interesting by showing the film from the end to the beginning, enhancing the story telling element by filling the film with mystery and exciting the audience into the story and secrets of the film. There can be more than one type of editing in a film, as some would use jump cuts, cross cutting or flashbacks. The typical editing for a horror would use flashbacks to explain the secret behind the serial killer and the monster behind the mask, so we sympathies with him and understand why he does what he does, as there is always a hidden reason behind everything. To make a horror more interesting, we could change up the usual editing,starting it in the middle of a climactic scene and then deciding to change it abruptly with a jump cut and then a flashback to the previous scene on how this happened, and then cut the two in between.

Monday, 4 January 2016

Lighting check

Our second day of filming requires us to go to the field. This means we have no control over the lighting on the day, so I've decided to go to the field at different times of the day to see when the light changes and see when is best for us to film.
 
With the general weather, there are no times during the day where it looks different as the sky is always clouded over apart from when it starts to get darker at around 3.30pm.

These pictures were taken an hour apart, one at 2:30pm and the second at 3:30pm:

I think that the best time to film is from 3pm onwards as it will gradually get darker while filming so will look darker and more effective for the film.
 
However, this also means we will have to establish the shots first and film them in the exact order, as if we miss a shot and film it after the rest are done, the continuity of the lighting will be poor.

Thursday, 17 December 2015

Practical: killer's mask

Inspiration
This mask will be reminiscent of the mask worn by The Scarecrow in Batman Begins. We think that this is effective because it is easy to make but still looks scary and makes the killer look more insane.

Things I needed:
- hessian sack
- needle and black thread
- scissors
- fake blood + water + black food colouring

To start with, I had to wear the sack over my head to get the marks for where I'd cut out the eye holes. When I took it off, I cut small slits where the marks were and pulled it to make it look ripped and messy.

Next I made a long frown-like cut slightly lower than where my mouth was and pulled parts of it again. I then used the black thread to sew up the mouth like the Scarecrow's with varying lengths of the thread for each line. When I got to the end, I went back over the lines again to make them thicker so they're easier to see.


Finally, I mixed a few drops of fake blood with a little bit of water and added black food colouring to make it darker. This would make a 'blood stain' that I spattered over the mask so it looked old, used and ultimately gorier.


I was happy with the finished product as it was easy to make and looks effective. However, it took a long time to sew the lines in, and the pictures I took make the blood stains look lighter and pinker, so I will have to make it even darker. Also, I may add more stitches scattered over the mask to be more like the Scarecrow's because it looks too new and not messy enough.

Wednesday, 16 December 2015

Editing: Re-colouring the killer's lair


Practical Task: Re-colouring the killer's lair in editing


As we are filming at a relative of mine's garage we want the garage to look like it could be in a run down location. The exterior of the garage is painted pink. This is too much of a light, happy colour to feature in a horror/slasher opening. Although we could possibly solve this by not filming outside, if we wanted to film there the colour would have to change. I thought about changing it in the editing process and tried to find tutorials on youtube that would help. I found this one:

This tutorial shows how to change the colour of certain parts of a video clip in Final Cut Pro (the editing software which we'll be using) which could be useful in making the garage (without altering the rest of the image) a different, darker colour. 
I opened Final Cut Pro and imported a picture of the garage. Using the blade tool i cut half way through the image to create a 'before and after' 

Then using the colour correction (correction 1 tab) and used a colour mask in order to hide the pink colouring on the image. I did this by using the eye drop tool and selecting the area in which I wanted to mask. I tried hard to only select the pink areas, although couldn't quite select the areas of orange around the garage. This would require a second mask that, if I was to do again, in the editing process, I would do. This is as, I didn't quite manage to remove all of the 'light' colours from the garage exterior which wouldn't fit in with the conventions of a typical slasher that is most often featuring dark, gloomy colours.


After selecting the area in which I wanted to change the colour off I had to adjust the colour I wanted instead. Using saturation, colour and exposure. I decided I was going to go for a greyscale look to create a further dark effect


^ As you can see from the above picture, I didn't select the orange parts of the image for masking.

Before & After


I wasn't too happy with the overall look, although I did succeed in making it look darker, however it still didn't look like it would take place in a dark and isolated place, perhaps if I used different positioning and framing and remove the houses in the background and added an effect to it, it would look more suitable for a slasher film. However, this is also just a picture, I'm not too sure what would happen if I did this as a video clip and if it was still look realistic.


Monday, 14 December 2015

Location - Killer's Lair

Locations: Killer's Lair


In our original drafts of our idea we Ideally wanted a basement for the killer’s lair, however couldn’t access one that was nearby or was cleaned out of storage. We then began looking into garages that would have the same effect as a basement would have that is somewhere dirty, cold and isolated with stone and brick walling. More people also have garages that we could use making it easier to find a location.

A relative of mine has given us permission to use their garage that is barely used. Which is in Gravesend. Although this is quite a distance from Maidstone it would be easier access for my group as my mum can drive us up there together for filming days.

I took pictures of the garage and looked at the area. A difficulty we may encounter is that outside of the garage is painted pink, this could be a problem as we preferably want dark colours to fit with the genre of horror and slasher. As we are not allowed to paint over it in a different colour, can solve this by either not filming outside or, in the editing process, change the colouring on Final cut pro through colouring masks.


The interior is dirty with grey white wooden walling. This creates an abandoned feel to it as it isn't well kept and could be set in an isolated location. to it as  There are also shelves running along the wall that we can either move out of the way or cover up with a sheet (although that might draw too much attention to the covered up shelf in the film opening and be distracting the audience) or put it to use by putting mis-en-scene from the killer’s lair on them (ie. The heart in a jar, killer’s journal etc.)


Overall the garage is quite large but with the added storage in there, there isn't much room. We’re able to move out of the way into one corner of the garage or outside for the day of filming. This is handy as if we use a 360 degree shots, we won’t show the other half of the garage. This gives us space to put our own props in as we need enough room for a full length table to have a ‘dead body’ as well as space for the victim to investigate the room. There area also clothes that are handing down on a wash line in the garage . This could further add to the idea that this is the killer's lair where they live.

Thursday, 3 December 2015

Actors in our Opening Scene

Actors

An opening scene conventionally introduces the characters to the audience, the main antagonist is being introduced in the opening scene because it is linked to the title and
In our opening scene we will have 3 female actors, but only two of them will be moving because the others will be dead people.


Kelsey will be the main character in the opening scene, she will be playing a teenager who has been kidnapped and put in a lair. It is very conventional for a teenage female to be a victim so Kelsey acting as the victim works really well.

Kelsey is 16 years old so she is suitable for the character we need her for, she also does drama so she is quite good at acting. Her age is also within the target audience age which means that she would be relatively relatable for the audience.


The killer will be played by Olivia, we are using a female to subvert the common representations of the gender of the killer in slasher films.
 
We haven't chosen an age for the killer in the film but Olivia's age doesn't really affect it because she will be wearing a sack over her face so her age will be unknown and can just be assumed.


In the scene I am going to be a dead person on a table so it looks like the killer has just killed me. I'm not very good at acting so it's good for me to have a role that doesn't involve any acting.


Location scouting: field

Part of our idea is that the victim will run out of the 'lair' and into a field. She has no goal but just wants to get away from the killer.
 
Near where I live, there is a large field and forest area. The road up to it turns into a track that gets thinner until it gets to the field.

I think this location would be effective because it is large and very empty. When it is darker it looks gloomy and cold, adding to the darkness of the scene.


Wednesday, 2 December 2015

Practical: Missing Posters Photoshop

Missing Posters

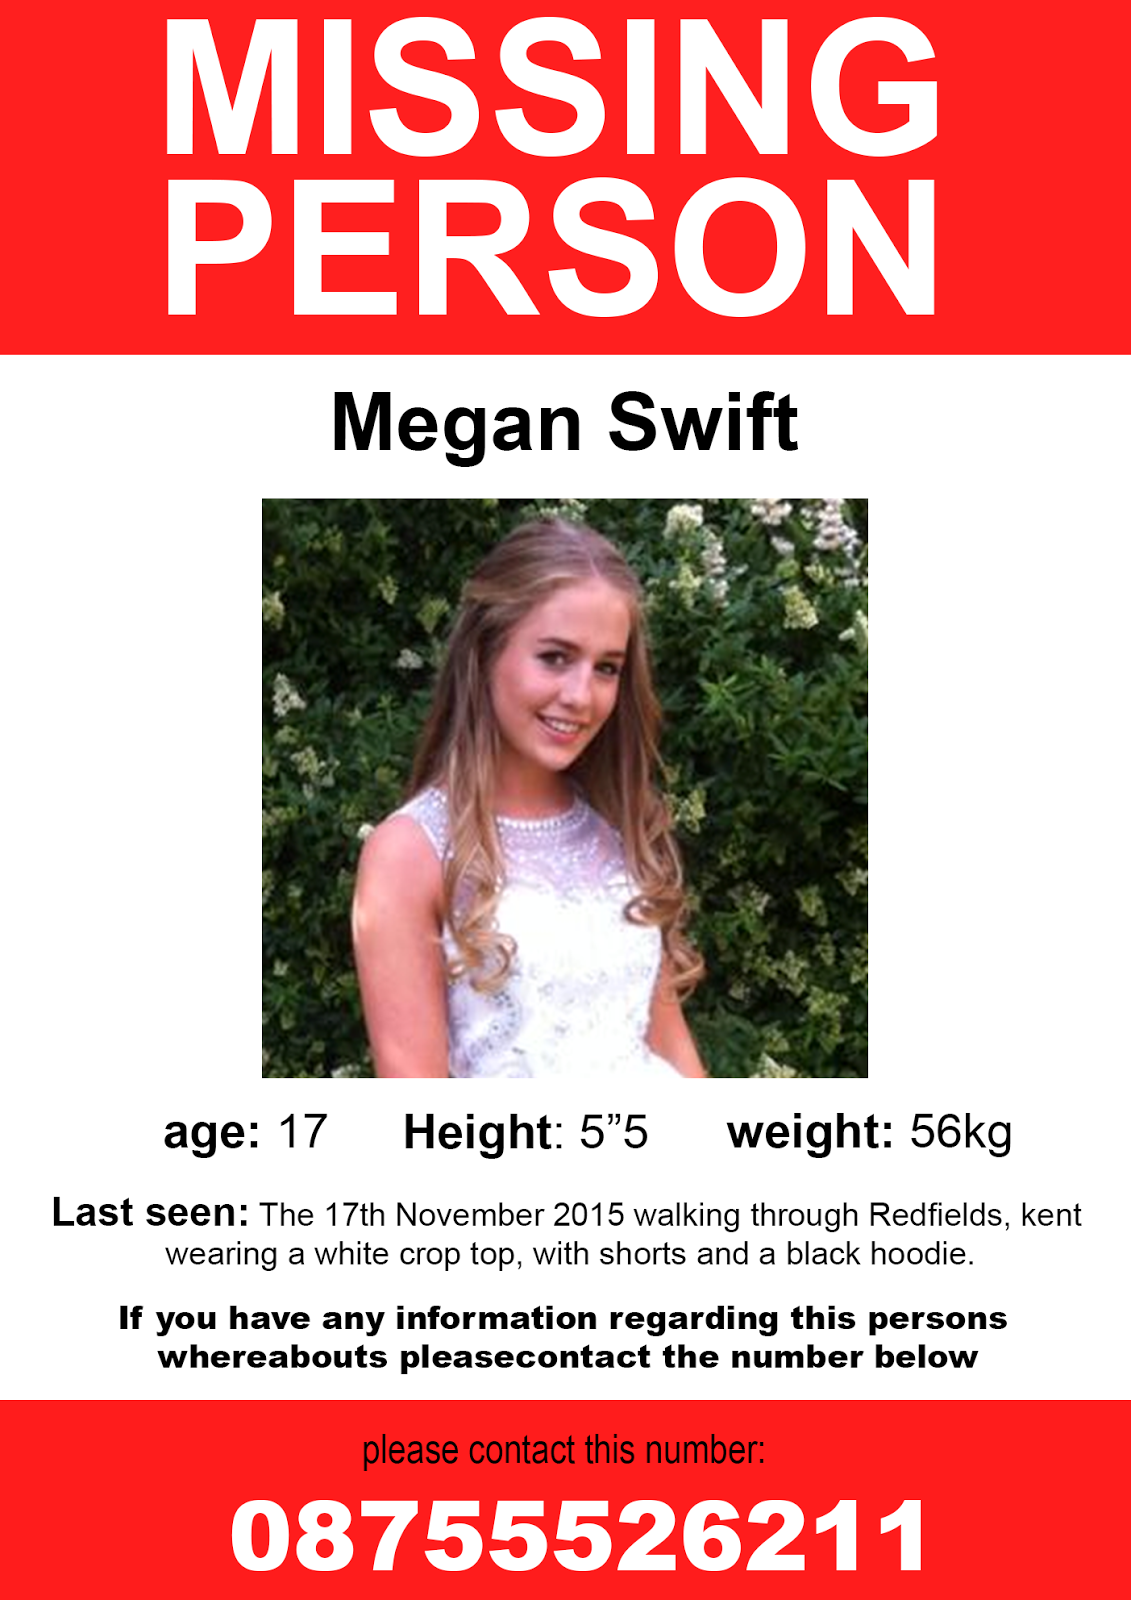
For our narrative story for our horror-slasher opening scene, our victims are girls that have gone missing, all from a similar location in a place called 'Redfields' where our film is set and also where the killer's lair is. As the protagonist of the opening scene looks around the room she discovers missing posters in the killers lair of the girls he has killed. In order to portray realism we decided to create posters with pictures of the girls acting in the film opening. This would allow us to do close up shots of the missing posters to help the audience understand the backstory of the killer. This will also show that this victim has been missing for some time. I used Photoshop to make them, beginning research by looking at real missing posters and mimicking them on photoshop.

From this research I discovered a lot of red colours are used in missing posters to make it stand out, with simple san serif text in black. Basic details are used such as age, height and weight as well as when they were last seen with what they wore and information on their appearance. 

I came up with a fake name for the dead character, using the actress's real details of age, weight and height to show realism in the missing poster to what is being shown on screen. I found that the information I put on the poster wasn't too clattered, but still gave enough detail in order to show it is a missing poster. I used a picture where the actress was alone, facing the camera frontwards, as if this would be in real life a picture such as this would be used to give people walking past a good idea into what they look like. In order for my poster to stand out and 'catch people's eyes' I used a bright red with white text over it saying 'Missing Person' in capitals.

This was my final Product:


 Overall I think what I created looked realistic and could be used in our own opening video effectively with lots of close-up shots of specific details of it, such as where she was last scene as well as a extreme close up of the heading 'MISSING PERSON' to create an effect of panic for the character looking at the poster before seeing the dead body of the missing girl in front of her.